User roles
Users are divided into the following categories:
- Registered (registration requires email address as a login name and a password), with following subcategories relatively to project:
- Administrators, can upload files and make changes to projects, add and remove project members, remove projects, share projects with unregistered users.
- Read/write - can upload and delete files, run analysis;
- Read-only - can only run analysis and view results.
- Unregistered ("Anonymous") user, have Read/write roles in public projects.
Project types
All users can create projects. User who created a project automatically becomes an Administrator in this project. Projects can be divided into the following groups:
- Private - all projects (by default) created by registered users. Project Administrator can add or remove project members.
- Public - all projects created by Anonymous user (by default) or projects which were made public by their Administrators. In the first case Anonymous user has Administrator role, but cannot really use it (for only registered users have "Settings" panel): he cannot remove project or make it private. In the second case, Anonymous user has Read-only role, but project Administrator can make project private anytime, or even remove it.
All project names (Project IDs) should be unique! Project IDs can contain only upper and lower letters of Latin alphabet and digits.
Project Administrators special warning
Project Administrators can change roles of the project users anytime. However, Administrators cannot do the following:
- Delete another Administrator from project.
- Change role of another Administrator.
All these manipulations can be done only by EviNet webmaster. Project Administrator should write a message to EviNet webmaster if one wants to perform any forbidden operations listed above.
How to manage your projects
First, log in into EviNet. If you are not registered yet - sign up. Please use valid mail for registration. Then choose Project settings button.

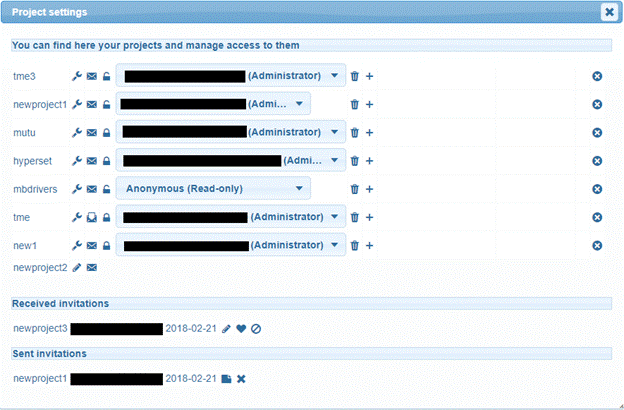
In the opened form you can see your projects and their options.

This page contains 3 tables:
- Projects you are currently member of.
- Projects you were invited to join.
- Invitations you have sent.
We are going to discuss these tabs in details. Please note that some elements are only visible to Administrator.
First, projects table. From left to right:
- Project ID - these IDs are used for project access.
- Your access level - this column shows your role in each project. Point to the icon to get description.
- Accept notifications - if you want to receive notifications from the project, this option should be checked (opened envelope). This setting is important for Administrators.
- Project status - project can be private (locked icon) or public (unlocked icon). Press the locked icon to make the project public. Visible only to Administrator.
- Project members - this column contains select menus with members for each project where you has an Administrator role. See "Listing project members" for additional information.
- Delete member - press this button to remove the chosen member from the respective project (also see "Project Administrators special warnings").
- Add member - press this button to open fields for adding a new member to your project (see "Adding project members" and "Changing user role").
Second, received invitations table, from left to right:
- Project ID - ID of the project you have been invited to join.
- Sent by - username (mail) of Administrator who has invited you.
- Invitation date.
- Your access level - your proposed role in the project.
- Accept and Reject buttons - these buttons allow to accept or reject invitation. Warning: this cannot be undone.
Finally, sent invitations, from left to right:
- Project ID - ID of the project you have invited a new member to.
- Member - username (mail) of the invited member.
- Invitation date.
- Access level - role you have offered to the invited member.
- Cancel invitation button - click this button to cancel invitation.
See "Invitations" to learn more about invitations.
Listing project members
If you have an Administrator role in project, you can view and manage project members. To do this, just click on the selector in "Project settings" window.

You can see member's username (email address) and role in the respective project.
Invitations
Members cannot be added to the project directly. Instead, we use mechanisms of invitations, so each user can decide if to join a project or not. The following rules and restrictions regulates the procedure of adding a new member to the project:
- Only Administrators can send invitations.
- Invitations can be sent to registered users with activated accounts only.
- Only one invitation to a specific project can exist for a user. This means the following:
- Several invitations cannot be sent by Administrator.
- Several invitations cannot be sent to a user by different Administrators. Only the first invitation will be sent. Administrators cannot view invitations of each other, but can get notifications about invitations via mail.
- Invitation cannot be changed. If you need to change it - cancel it and send a new one.
Inviting project members
To invite a new member to your project, just click Add member button in the "Project settings" window for the respective project (you have to be an Administrator).

Type email of the registered EviNet user into the appeared input field, choose the desired role using selector to the right of the input field and click Add button (curved arrow next to role selector). In the case of success pop-up window with success message will appear and you will see invitation in sent invitations tab.
Warning: user has to be registered before joining the project. If the person does not have EviNet account - ask one to register. See also "Project Administrators special warning".
Accept or reject an invitation
Received notifications tab has 3 icons after the date field: the first one indicates your role in the project (point to this pictogram to get the text description), the remaining ones are Accept (heart) and Reject (crossed circle) buttons respectively.

To accept or reject an invitation simply click the respective buttons in received invitations table. The invitation will immediately disappear from received invitations table and (if the invitation has been accepted) a new record for the project will appear in your projects table.
Cancel an invitation
Invitation can be cancelled anytime before user accepts/rejects it. To cancel an invitation simply click Cancel invitation button for the respective project.

Invitation will disappear from your sent invitations table and member's received invitations table. Warning: if you cancel an invitation when member you sent invitation to already has opened "Project settings" window, member will still be able to press Accept or Reject, but the result of this operation will be failure because invitation does not exist anymore.
If you sent invitation by mistake and member has accepted it - you can delete him from the project (see "Removing member from a project") if he is not an Administrator. If he has an Administrator role - see "Project Administrators special warning".
Changing user role
You can change user role by simply adding him again to the project (without removing). For example, you have user user@example.com with access level "Read-only". You can change user role to "Read/write" by clicking Add member button, typing user@example.com into the input field, choosing "Read/write" with the selector and clicking Add button. You can give user the same rights user already had. You can find matrix of transitions between different roles below. Columns list current roles and rows list desired roles, if transition can be made - there will be "+" sign in the respective cell (or "-" sign in the opposite case).
|
Desired role\Current role |
Read-only |
Read/write |
Administrator |
|
Read-only |
- |
+ |
- |
|
Read/write |
+ |
- |
- |
|
Administrator |
+ |
+ |
- |
See also "Project Administrators special warning".
Removing member from a project
To delete a project member choose the required member from the project member list (see "Listing project members") and click the Delete member button (trashcan) to the right of the project member list. Confirm your choice. See also "Project Administrators special warning".
Public projects
Projects, created by Anonymous user, are always public, which means everyone can access them using Project ID. However, such projects (created by Anonymous) will not be displayed in Project table of registered users.
Registered users can make their projects public. Such public projects are different from public projects, created by Anonymous:
- Project members can see such projects in their "Project settings".
- Such projects may become private again.
To make project public, just click Make public button (with locked padlock) of the respective project.

If you confirm project publishing, user Anonymous will be added to the project with Read-only access level.

To make project private again, just choose Anonymous user and press Delete member button.
Changing profile settings
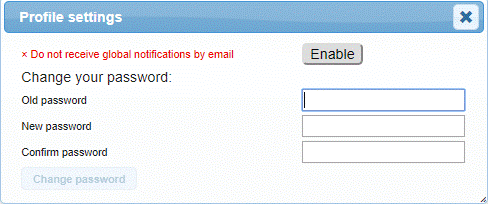
To change your profile settings, click the Profile settings button.

Here you can change your global notifications status or password.

Global notifications status is the default status for all the projects you create. If you have enabled it, new project will be created with enabled notifications. Warning: changing this setting will also affect all the current projects! You have to restore settings for specific projects.
You can also change your password here. If you do not remember your password, you have to log out and use "Forgot password" option (or do it from another device). Warning: all your sessions (except for the one in which you have changed your password) will be closed due to security reasons.